An analog joystick has the followin two dimensions(x and y axis) and state that is set when joystick is pressed
Components Required
- Arduino uno
- Arduino Mega 2560(any board you have can work. This tutorial will used Arduino Mega 2560)
- KY-023 Joystick.
- 2 jumper wired
pins
KY-023 has 5 pins
- GND - Ground Pin
- +5V (5V pin)
- VRX(X-axis voltage)
- VRY(Y-axis voltage)
- SW (correponds to pressing down the middle joystick button)
Procedure
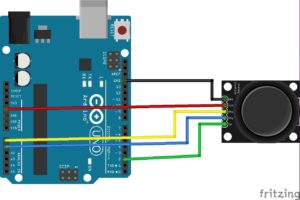
- Set up your connection as shown in the followinf image.

-
Connect ground pin to ground
-
Connect 5v pin to arduino 5v
-
Connect VRX to ‘A0’
-
Connect VRY to “A1”
-
SW pin is connected to pin ‘2’
At the top
1
2
3
4
5
6
7
8
|
const int inX = A0; // analog input for x-axis
const int inY = A1; // analog input for y-axis
const int inPressed = 2; // input for detecting whether the joystick/button is pressed

int xValue = 0; // variable to store x value
int yValue = 0; // variable to store y value
int notPressed = 0; // variable to store the button's state => 1 if not pressed
|
- In the
setup()
1
2
3
4
5
|
  pinMode(inX, INPUT); // setup x input
  pinMode(inY, INPUT); // setup y input
  pinMode(inPressed, INPUT_PULLUP); // we use a pullup-resistor for the button functionality

  Serial.begin(9600); // Setup serial connection for print out to console
|
- In the
loop() function write:
 1
 2
 3
 4
 5
 6
 7
 8
 9
10
11
12
13
14
15
|
  xValue = analogRead(inX); // reading x value [range 0 -> 1023]
  yValue = analogRead(inY); // reading y value [range 0 -> 1023]
  notPressed = digitalRead(inPressed); // reading button state: 1 = not pressed, 0 = pressed

  // print out values
  Serial.print("X: ");
  Serial.println(xValue);
  Serial.print("Y: ");
  Serial.println(yValue);
  Serial.print("Not pressed: ");
  Serial.println(notPressed);

  // The following delay of 1000ms is only for debugging reasons (it's easier to follow the values on the serial monitor)
  delay(1000); // Probably not needed for most applications
|
Full source Code
 1
 2
 3
 4
 5
 6
 7
 8
 9
10
11
12
13
14
15
16
17
18
19
20
21
22
23
24
25
26
27
28
29
30
31
32
33
|
const int inX = A0; // analog input for x-axis
const int inY = A1; // analog input for y-axis
const int inPressed = 2; // input for detecting whether the joystick/button is pressed

int xValue = 0; // variable to store x value
int yValue = 0; // variable to store y value
int notPressed = 0; // variable to store the button's state => 1 if not pressed

void setup() {
  pinMode(inX, INPUT); // setup x input
  pinMode(inY, INPUT); // setup y input
  pinMode(inPressed, INPUT_PULLUP); // we use a pullup-resistor for the button functionality

  Serial.begin(9600); // Setup serial connection for print out to console
}

void loop() {
  xValue = analogRead(inX); // reading x value [range 0 -> 1023]
  yValue = analogRead(inY); // reading y value [range 0 -> 1023]
  notPressed = digitalRead(inPressed); // reading button state: 1 = not pressed, 0 = pressed

  // print out values
  Serial.print("X: ");
  Serial.println(xValue);
  Serial.print("Y: ");
  Serial.println(yValue);
  Serial.print("Not pressed: ");
  Serial.println(notPressed);

  // The following delay of 1000ms is only for debugging reasons (it's easier to follow the values on the serial monitor)
  delay(1000); // Probably not needed for most applications
}
|
